


A bathroom’s personality often begins with a single decision: your vanity. Whether you’re craving spa-like serenity or a bold statement piece, the right choice becomes the anchor for the entire space. Yet, picking and installing that game-changing feature is filled with pitfalls and possibilities that every homeowner should know before making a move.
Setting the Stage: Why Your Bathroom Vanity Matters
The vanity is the bathroom’s multitasker. It hides your hairdryer, anchors your morning routine, and defines the visual tone. Get it wrong, and you end up with clutter, cramped movement, or a style mismatch that nags every time you brush your teeth. Get it right, and you blend storage, beauty, and function in a seamless experience.
Yet, homeowners regularly struggle with the balance between size and storage, wall-hung versus freestanding, and an overwhelming array of materials and finishes. The trick is to approach the upgrade like a designer and a pragmatist all at once.
Case Study 1: Selecting the Perfect Vanity for a Compact Bathroom
Small bathrooms have no margin for error. Every inch counts, and the wrong vanity can shrink your space even more. Start by measuring the available width, compact vanities range from as narrow as 12 inches up to 28 inches. In tight quarters, wall-hung (or floating) designs free up floor space, creating an illusion of openness and making cleaning dramatically easier.
Color plays a quiet but critical role. Light finishes like white or pale oak visually expand the room, while glossy surfaces bounce extra light around. Materials matter, too: moisture-resistant laminates or engineered wood can handle daily splashes far better than untreated wood.
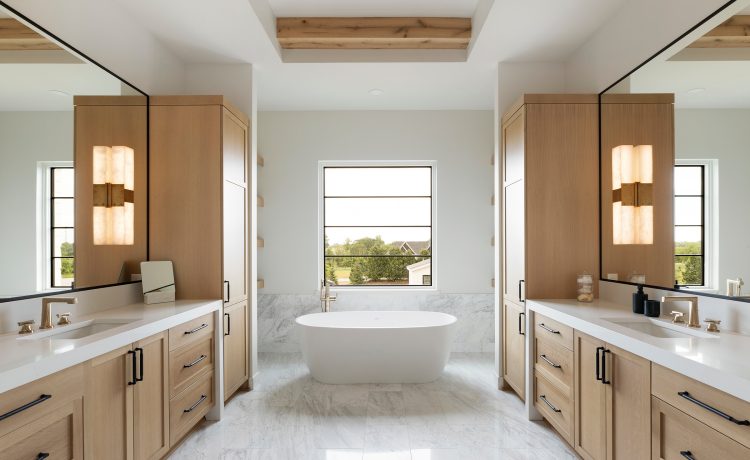
Case Study 2: Creating Luxury with a Double Sink Vanity in a Master Bathroom
In a spacious primary bathroom, a double sink vanity can feel luxurious and practical. These usually range from 60 to 72 inches and require careful coordination with plumbing. The countertop becomes the showpiece, so consider durable materials like engineered quartz or solid surface options for both style and longevity.
Combining a bold cabinet finish with a crisp countertop creates drama without overwhelm. Think walnut with matte white, or black with streaks of marble. Storage remains vital, drawers for makeup, shelves for towels, hidden compartments for those items you’d rather keep out of sight.
Case Study 3: Transforming a Traditional Bathroom with Modern Vanity Styles
Modern floating vanities are the go-to for anyone looking to refresh a tired, traditional bathroom. The minimalist lines and open space underneath instantly update the look. But modern doesn’t have to mean stark white. Textured finishes like rough oak or deep walnut introduce warmth, while matte black hardware provides contrast that pops.
Lighting completes the transformation. Integrated LED mirrors or statement sconces can elevate your vanity area from basic to breathtaking, especially when coordinated with the cabinet and faucet hardware for a unified look.
Practical Steps to Installing Your Bathroom Vanity
Preparation is key. Before installation, assemble the right tools: a level, stud finder, measuring tape, power drill, silicone sealant, and proper anchors. Shut off your water supply and clear the area.
Wall-Hung Vanity Installation
1. Locate studs and mark mounting points.
2. Secure the mounting bracket or vanity back panel into studs for maximum support.
3. Hang the vanity and check with a level before tightening fully.
4. Attach plumbing, seal around sinks, and mount countertop.
Freestanding Vanity Installation
1. Position the vanity and align with existing plumbing.
2. Secure the unit to the wall to prevent tipping.
3. Install faucet and drain, then set the countertop with silicone.
4. Reconnect water supply and test for leaks.
Common pitfalls? Skipping stud anchors on wall-hung units (a recipe for disaster), failing to level the vanity, or using the wrong sealant for your countertop material.
Maintenance and Longevity: Caring for Your Vanity Investment
Frequent splashes and steam mean bathroom vanities need regular attention. For most materials, a soft cloth and mild soap do the trick. Avoid harsh cleaners that can dull finishes or etch stone. For engineered quartz or solid surfaces, quick daily wipes prevent buildup. Wood vanities may need periodic resealing.
If drawers start sticking or the finish fades, most modern vanities offer replacement parts or simple touch-up kits. However, if warping or water damage sets in, it may be time to consider a replacement or a full upgrade.
Bringing It All Together: Designing a Vanity That Elevates Your Bathroom
The best results come from harmony: your vanity should echo the bathroom’s colors, textures, and style. Prioritize features that matter most, soft-close drawers, integrated lighting, or a specific countertop material, without overspending on extras you’ll never use.
Before committing, consult real-world examples and expert guidance. Visiting a showroom allows you to experience the weight, color, and quality firsthand. Online resources for bathroom vanities can further streamline your search by letting you filter by size, style, color, and more.
A thoughtfully chosen and well-installed vanity will not just transform your space, but set the tone for every day that begins and ends in your bathroom.


